彩灯驱动
Update history
| Date | Version | Author | Update content |
|---|---|---|---|
| 2024-12-05 | 1.0.1 | 老怪鸽 | 更新了基本文档 |
硬件准备
WS2812矩阵彩灯
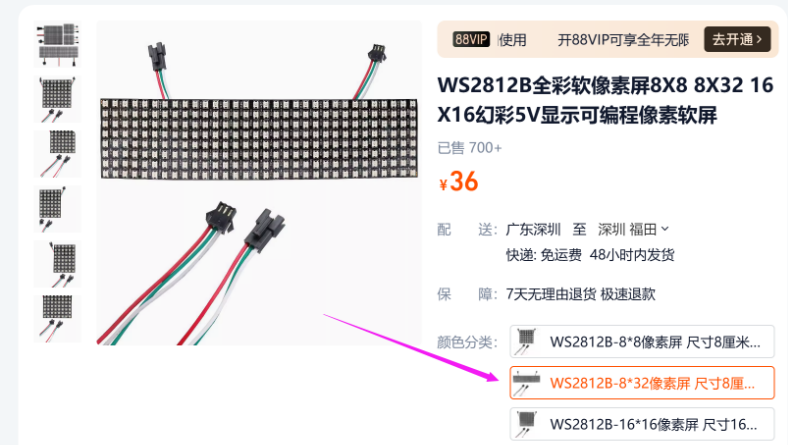
购买地址:WS2812B全彩软像素屏8X8 8X32 16X16幻彩5V显示可编程像素软屏
ESP32S3开发板
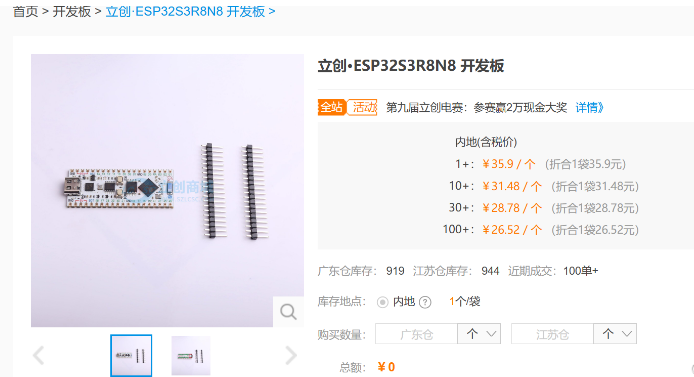
购买地址:立创·ESP32S3R8N8 开发板
工程创建
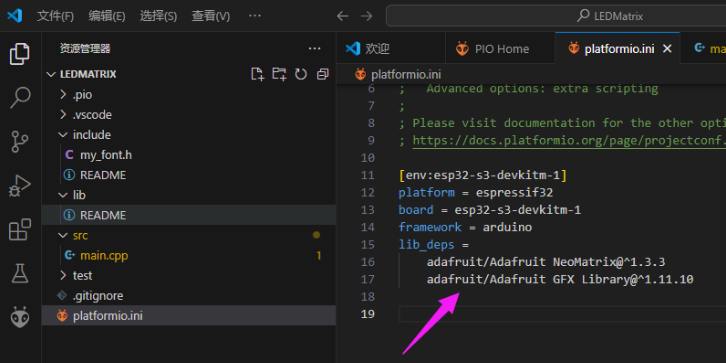
在VSCode中打开PlatformIO扩展创建名为LEDMatrix的 Espressif ESP32-S3-DevKitM-1 工程。
关于详细图文创建工程的过程请参考👉RTC时钟驱动章节的工程创建小节。
安装驱动库
最底层的驱动,需要分别安装两个库:
搜索
Adafruit NeoMatrix,安装来自Adafruit的Adafruit NeoMatrix库。搜索
Adafruit GFX Library,安装来自Adafruit的Adafruit GFX Library库。
将它们都安装到我们的工程当中。
关于详细图文安装驱动库的过程请参考👉RTC时钟驱动章节的安装驱动库小节。
都安装完成之后,打开platformio.ini文件,可以看到已经安装上了两个驱动库。
编辑代码
首先导入我们的字库,这里我提供给大家一个ascii的字库。在工程下的include文件夹下新建一个 my_font.h文件。
接下来往 my_font.h 文件写入我们的字模代码:
直接复制以下代码到你的文件下
#include "Arduino.h"
#include "Adafruit_GFX.h"

const uint8_t PicopixelBitmaps[] PROGMEM = {
    0xE8, 0xB4, 0x57, 0xD5, 0xF5, 0x00, 0x4E, 0x3E, 0x80, 0xA5, 0x4A, 0x4A,
    0x5A, 0x50, 0x80, 0x6A, 0x40, 0x95, 0x80, 0xAA, 0x80, 0x5D, 0x00, 0x60,
    0xE0, 0x80, 0x25, 0x48, 0xF6, 0xDE, 0x59, 0x2E, 0xE7, 0xCE, 0xE7, 0x9E,
    0xB7, 0x92, 0xF3, 0x9E, 0xF3, 0xDE, 0xE4, 0x92, 0xF7, 0xDE, 0xF7, 0x9E,
    0xA0, 0x46, 0x64, 0xE3, 0x80, 0x98, 0xC5, 0x04, 0x56, 0xC6, 0x57, 0xDA,
    0xD7, 0x5C, 0x72, 0x46, 0xD6, 0xDC, 0xF3, 0xCE, 0xF3, 0x48, 0x72, 0xD4,
    0xB7, 0xDA, 0xF8, 0x24, 0xD4, 0xBB, 0x5A, 0x92, 0x4E, 0x8E, 0xEB, 0x58,
    0x80, 0x9D, 0xB9, 0x90, 0x56, 0xD4, 0xD7, 0x48, 0x56, 0xD4, 0x40, 0xD7,
    0x5A, 0x71, 0x1C, 0xE9, 0x24, 0xB6, 0xD4, 0xB6, 0xA4, 0x8C, 0x6B, 0x55,
    0x00, 0xB5, 0x5A, 0xB5, 0x24, 0xE5, 0x4E, 0xEA, 0xC0, 0x91, 0x12, 0xD5,
    0xC0, 0x54, 0xF0, 0x90, 0xC7, 0xF0, 0x93, 0x5E, 0x71, 0x80, 0x25, 0xDE,
    0x5E, 0x30, 0x6E, 0x80, 0x77, 0x9C, 0x93, 0x5A, 0xB8, 0x45, 0x60, 0x92,
    0xEA, 0xAA, 0x40, 0xD5, 0x6A, 0xD6, 0x80, 0x55, 0x00, 0xD7, 0x40, 0x75,
    0x90, 0xE8, 0x71, 0xE0, 0xBA, 0x40, 0xB5, 0x80, 0xB5, 0x00, 0x8D, 0x54,
    0xAA, 0x80, 0xAC, 0xE0, 0xE5, 0x70, 0x6A, 0x26, 0xFC, 0xC8, 0xAC, 0x5A};

const GFXglyph PicopixelGlyphs[] PROGMEM = { {0, 0, 0, 2, 0, 1},     // 0x20 ' '
                                            {0, 1, 5, 2, 0, -4},    // 0x21 '!'
                                            {1, 3, 2, 4, 0, -4},    // 0x22 '"'
                                            {2, 5, 5, 6, 0, -4},    // 0x23 '#'
                                            {6, 3, 6, 4, 0, -4},    // 0x24 '$'
                                            {9, 3, 5, 4, 0, -4},    // 0x25 '%'
                                            {11, 4, 5, 5, 0, -4},   // 0x26 '&'
                                            {14, 1, 2, 2, 0, -4},   // 0x27 '''
                                            {15, 2, 5, 3, 0, -4},   // 0x28 '('
                                            {17, 2, 5, 3, 0, -4},   // 0x29 ')'
                                            {19, 3, 3, 4, 0, -3},   // 0x2A '*'
                                            {21, 3, 3, 4, 0, -3},   // 0x2B '+'
                                            {23, 2, 2, 3, 0, 0},    // 0x2C ','
                                            {24, 3, 1, 4, 0, -2},   // 0x2D '-'
                                            {25, 1, 1, 2, 0, 0},    // 0x2E '.'
                                            {26, 3, 5, 4, 0, -4},   // 0x2F '/'
                                            {28, 3, 5, 4, 0, -4},   // 0x30 '0'
                                            {30, 3, 5, 4, 0, -4},   // 0x31 '1'
                                            {32, 3, 5, 4, 0, -4},   // 0x32 '2'
                                            {34, 3, 5, 4, 0, -4},   // 0x33 '3'
                                            {36, 3, 5, 4, 0, -4},   // 0x34 '4'
                                            {38, 3, 5, 4, 0, -4},   // 0x35 '5'
                                            {40, 3, 5, 4, 0, -4},   // 0x36 '6'
                                            {42, 3, 5, 4, 0, -4},   // 0x37 '7'
                                            {44, 3, 5, 4, 0, -4},   // 0x38 '8'
                                            {46, 3, 5, 4, 0, -4},   // 0x39 '9'
                                            {48, 1, 3, 2, 0, -3},   // 0x3A ':'
                                            {49, 2, 4, 3, 0, -3},   // 0x3B ';'
                                            {50, 2, 3, 3, 0, -3},   // 0x3C '<'
                                            {51, 3, 3, 4, 0, -3},   // 0x3D '='
                                            {53, 2, 3, 3, 0, -3},   // 0x3E '>'
                                            {54, 3, 5, 4, 0, -4},   // 0x3F '?'
                                            {56, 3, 5, 4, 0, -4},   // 0x40 '@'
                                            {58, 3, 5, 4, 0, -4},   // 0x41 'A'
                                            {60, 3, 5, 4, 0, -4},   // 0x42 'B'
                                            {62, 3, 5, 4, 0, -4},   // 0x43 'C'
                                            {64, 3, 5, 4, 0, -4},   // 0x44 'D'
                                            {66, 3, 5, 4, 0, -4},   // 0x45 'E'
                                            {68, 3, 5, 4, 0, -4},   // 0x46 'F'
                                            {70, 3, 5, 4, 0, -4},   // 0x47 'G'
                                            {72, 3, 5, 4, 0, -4},   // 0x48 'H'
                                            {74, 1, 5, 2, 0, -4},   // 0x49 'I'
                                            {75, 3, 5, 4, 0, -4},   // 0x4A 'J'
                                            {77, 3, 5, 4, 0, -4},   // 0x4B 'K'
                                            {79, 3, 5, 4, 0, -4},   // 0x4C 'L'
                                            {81, 5, 5, 6, 0, -4},   // 0x4D 'M'
                                            {85, 4, 5, 5, 0, -4},   // 0x4E 'N'
                                            {88, 3, 5, 4, 0, -4},   // 0x4F 'O'
                                            {90, 3, 5, 4, 0, -4},   // 0x50 'P'
                                            {92, 3, 6, 4, 0, -4},   // 0x51 'Q'
                                            {95, 3, 5, 4, 0, -4},   // 0x52 'R'
                                            {97, 3, 5, 4, 0, -4},   // 0x53 'S'
                                            {99, 3, 5, 4, 0, -4},   // 0x54 'T'
                                            {101, 3, 5, 4, 0, -4},  // 0x55 'U'
                                            {103, 3, 5, 4, 0, -4},  // 0x56 'V'
                                            {105, 5, 5, 6, 0, -4},  // 0x57 'W'
                                            {109, 3, 5, 4, 0, -4},  // 0x58 'X'
                                            {111, 3, 5, 4, 0, -4},  // 0x59 'Y'
                                            {113, 3, 5, 4, 0, -4},  // 0x5A 'Z'
                                            {115, 2, 5, 3, 0, -4},  // 0x5B '['
                                            {117, 3, 5, 4, 0, -4},  // 0x5C '\'
                                            {119, 2, 5, 3, 0, -4},  // 0x5D ']'
                                            {121, 3, 2, 4, 0, -4},  // 0x5E '^'
                                            {122, 4, 1, 4, 0, 1},   // 0x5F '_'
                                            {123, 2, 2, 3, 0, -4},  // 0x60 '`'
                                            {124, 3, 4, 4, 0, -3},  // 0x61 'a'
                                            {126, 3, 5, 4, 0, -4},  // 0x62 'b'
                                            {128, 3, 3, 4, 0, -2},  // 0x63 'c'
                                            {130, 3, 5, 4, 0, -4},  // 0x64 'd'
                                            {132, 3, 4, 4, 0, -3},  // 0x65 'e'
                                            {134, 2, 5, 3, 0, -4},  // 0x66 'f'
                                            {136, 3, 5, 4, 0, -3},  // 0x67 'g'
                                            {138, 3, 5, 4, 0, -4},  // 0x68 'h'
                                            {140, 1, 5, 2, 0, -4},  // 0x69 'i'
                                            {141, 2, 6, 3, 0, -4},  // 0x6A 'j'
                                            {143, 3, 5, 4, 0, -4},  // 0x6B 'k'
                                            {145, 2, 5, 3, 0, -4},  // 0x6C 'l'
                                            {147, 5, 3, 6, 0, -2},  // 0x6D 'm'
                                            {149, 3, 3, 4, 0, -2},  // 0x6E 'n'
                                            {151, 3, 3, 4, 0, -2},  // 0x6F 'o'
                                            {153, 3, 4, 4, 0, -2},  // 0x70 'p'
                                            {155, 3, 4, 4, 0, -2},  // 0x71 'q'
                                            {157, 2, 3, 3, 0, -2},  // 0x72 'r'
                                            {158, 3, 4, 4, 0, -3},  // 0x73 's'
                                            {160, 2, 5, 3, 0, -4},  // 0x74 't'
                                            {162, 3, 3, 4, 0, -2},  // 0x75 'u'
                                            {164, 3, 3, 4, 0, -2},  // 0x76 'v'
                                            {166, 5, 3, 6, 0, -2},  // 0x77 'w'
                                            {168, 3, 3, 4, 0, -2},  // 0x78 'x'
                                            {170, 3, 4, 4, 0, -2},  // 0x79 'y'
                                            {172, 3, 4, 4, 0, -3},  // 0x7A 'z'
                                            {174, 3, 5, 4, 0, -4},  // 0x7B '{'
                                            {176, 1, 6, 2, 0, -4},  // 0x7C '|'
                                            {177, 3, 5, 4, 0, -4},  // 0x7D '}'
                                            {179, 4, 2, 5, 0, -3} }; // 0x7E '~'

const GFXfont Picopixel PROGMEM = {(uint8_t *)PicopixelBitmaps,
                                   (GFXglyph *)PicopixelGlyphs, 0x20, 0x7E, 7};
字模准备完毕,我们可以点亮彩灯矩阵,并且显示ascii的字符了!
打开工程下的src文件夹下的main.cpp。
输入以下代码:
#include <Arduino.h>
#include <Adafruit_NeoMatrix.h> //点亮LED矩阵需要的库
#include "my_font.h" //引用文字库头文件
//像素阵列定义
#define kMatrixWidth 32 //宽度
#define kMatrixHeight 8 //高度
#define BRIGHTNESS 10 //默认亮度 0-255
#define BRIGHTNESS_INTERVAL 30 //亮度调节间隔
#define LED_PIN 8 //像素阵列引脚
Adafruit_NeoMatrix *matrix; //LED矩阵类指针
//像素矩阵初始化
void InitLED_Matrix(void)
{
//设置像素矩阵的方向以及排列方式
matrix = new Adafruit_NeoMatrix(32, 8, LED_PIN, NEO_MATRIX_TOP + NEO_MATRIX_LEFT+
NEO_MATRIX_COLUMNS + NEO_MATRIX_ZIGZAG,
NEO_GRB + NEO_KHZ800);
matrix->setTextWrap(false); //设置文字是否自动换行
matrix->setFont(&Picopixel); //设置字体
matrix->clear(); //清除当前显示内容
matrix->setBrightness(BRIGHTNESS);//设置亮度
}
//显示信息
void ShowMessage(Adafruit_NeoMatrix *matrix, char *message, int len, uint32_t color)
{
//清除上一次的显示内容
matrix->clear();
//设置文本颜色
matrix->setTextColor(color);
//如果显示的内容过长,或者过小
if (len < 1 || len > 8)
return;
//设置鼠标光标的位置用以确定在哪里显示文字
//X轴自动居中
matrix->setCursor(1 + (8 - len) * 2, 5);
//将显示的内容输出至缓存中
matrix->print(message);
//显示缓存中的内容
matrix->show();
}
void setup()
{
//初始化LED矩阵显示
InitLED_Matrix();
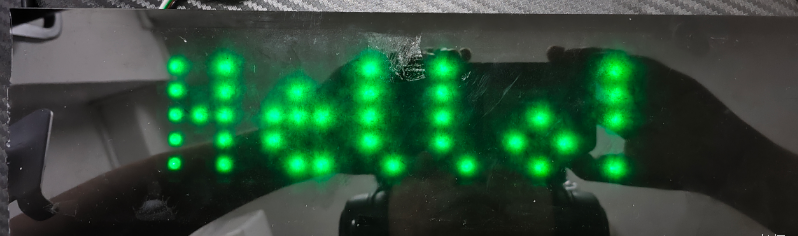
//显示 6 个字符,显示内容:Hello!,显示颜色:绿色(R,G,B)
ShowMessage(matrix, "Hello!", 6, matrix->Color(0, 255, 0));
}
void loop()
{
delay(1000);
}
硬件连接
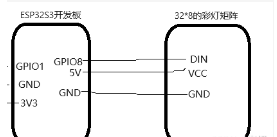
这里其实我是做了电路设计的,但是模块电路都是一样的。

代码验证
代码编写完成之后,将ESP32S3开发板接入电脑下载代码。然后观察彩灯矩阵的现象。
实物显示如下:
裸屏显示
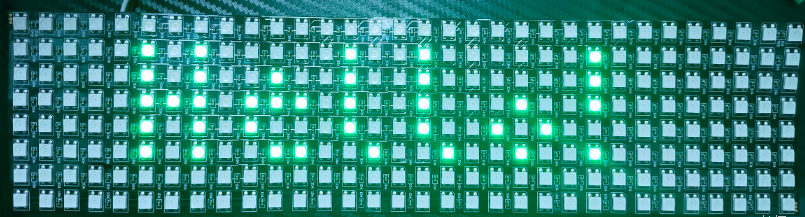
使用黑色亚克力面板+白纸格挡光线显示
叠层从上到下是这样的:黑色亚克力面板 -> 白纸 -> LED矩阵
示例一:显示下雨特效
文件创建分类
在工程下的
include文件夹下新建一个anim.h文件。在工程下的
src文件夹下新建一个anim.cpp文件。
代码编写
在 anim.h 文件中编写以下代码:
#ifndef _ANIM_H_
#define _ANIM_H_

#include <Adafruit_NeoMatrix.h>
#include "Arduino.h"


//数字雨动画
void movingPixel(Adafruit_NeoMatrix *matrix, int x, int y, int colorh);
void showRainingCode(Adafruit_NeoMatrix *matrix);

#endif
在 anim.cpp 文件中编写以下代码:
#include "anim.h"

//数字雨
int columnIndex[8];
int stepIndex[8];
int glow[8];
bool Running[8]={false, false, false, false, false, false, false, false};
int stepsTillNext[8] = {0, 6, 2, 11, 4, 10, 7, 1};

uint16_t hsv2rgb(Adafruit_NeoMatrix *matrix, uint16_t hue, uint8_t saturation, uint8_t value)
{
    uint8_t red = 0;
    uint8_t green = 0;
    uint8_t blue = 0;
    uint16_t hi = (hue / 60) % 6;
    uint16_t F = 100 * hue / 60 - 100 * hi;
    uint16_t P = value * (100 - saturation) / 100;
    uint16_t Q = value * (10000 - F * saturation) / 10000;
    uint16_t T = value * (10000 - saturation * (100 - F)) / 10000;

    switch (hi)
    {
    case 0:
        red = value;
        green = T;
        blue = P;
        break;
    case 1:
        red = Q;
        green = value;
        blue = P;
        break;
    case 2:
        red = P;
        green = value;
        blue = T;
        break;
    case 3:
        red = P;
        green = Q;
        blue = value;
        break;
    case 4:
        red = T;
        green = P;
        blue = value;
        break;
    case 5:
        red = value;
        green = P;
        blue = Q;
        break;
    default:
        return matrix->Color(255, 0, 0);
    }
    red = red * 255 / 100;
    green = green * 255 / 100;
    blue = blue * 255 / 100;
    return matrix->Color(red, green, blue);
}

//数字雨专用的移动像素特效
void movingPixel(Adafruit_NeoMatrix *matrix, int x, int y, int colorh)
{
    int pixel = y;
    matrix->drawPixel(x, pixel, hsv2rgb(matrix, colorh, 100, 100));
    if(pixel-1 >= 0){ matrix->drawPixel(x, pixel-1, hsv2rgb(matrix, colorh, 80, 80 ));}
    if(pixel-2 >= 0){ matrix->drawPixel(x, pixel-2, hsv2rgb(matrix, colorh, 70, 70 ));}
    if(pixel-3 >= 0){ matrix->drawPixel(x, pixel-3, hsv2rgb(matrix, colorh, 45, 45 ));}
    if(pixel-4 >= 0){ matrix->drawPixel(x, pixel-4, hsv2rgb(matrix, colorh, 25, 25 ));}
    if(pixel-5 >= 0){ matrix->drawPixel(x, pixel-5, hsv2rgb(matrix, colorh, 10, 10 ));}
    if(pixel-6 >= 0){ matrix->drawPixel(x, pixel-6, matrix->Color(0, 0, 0));}
}

//显示数字雨特效
void showRainingCode(Adafruit_NeoMatrix *matrix)
{
    for(int i=0; i<8; i++)
    {
        if(stepIndex[i] > stepsTillNext[i])
        {
            Running[i] = true;
            stepsTillNext[i] = 13;  // 进行数组初始化
            columnIndex[i] = random((i*4), ((i+1)*4));
            glow[i] = random(0, 2);     //随机背景置灰值
            stepIndex[i] = 0;
        }
        if(Running[i] == true)
        {
            movingPixel(matrix, columnIndex[i], stepIndex[i], 240);
            if(stepIndex[i] == 13)
            {
                Running[i] = false;
            }
        }
        stepIndex[i] += 1;
    }
}
最后在main.cpp中编写如果代码:
#include <Arduino.h>
#include <Adafruit_NeoMatrix.h> //点亮LED矩阵需要的库
#include "my_font.h"            //引用文字库头文件
#include "anim.h"            //引用我们自定义的动画头文件

//像素阵列定义
#define kMatrixWidth   32             //宽度
#define kMatrixHeight  8              //高度
#define BRIGHTNESS     50            //默认亮度 0-255
#define BRIGHTNESS_INTERVAL 30        //亮度调节间隔
#define LED_PIN        8              //像素阵列引脚

Adafruit_NeoMatrix *matrix;     //LED矩阵类指针

//像素矩阵初始化
void InitLED_Matrix(void)
{
  //设置像素矩阵的方向以及排列方式
  matrix = new Adafruit_NeoMatrix(32, 8, LED_PIN, NEO_MATRIX_TOP + NEO_MATRIX_LEFT+
    NEO_MATRIX_COLUMNS +  NEO_MATRIX_ZIGZAG,
    NEO_GRB + NEO_KHZ800);
  matrix->setTextWrap(false);       //设置文字是否自动换行
  matrix->setFont(&Picopixel);      //设置字体
  matrix->clear();                  //清除当前显示内容
  matrix->setBrightness(BRIGHTNESS);//设置亮度
}

//显示信息
void ShowMessage(Adafruit_NeoMatrix *matrix, char *message, int len, uint32_t color)
{
  //清除上一次的显示内容
  matrix->clear();

  //设置文本颜色
  matrix->setTextColor(color);

  //如果显示的内容过长,或者过小
  if (len < 1 || len > 8)
    return;

  //设置鼠标光标的位置用以确定在哪里显示文字
  //X轴自动居中
  matrix->setCursor(1 + (8 - len) * 2, 5);

  //将显示的内容输出至缓存中
  matrix->print(message);

  //显示缓存中的内容
  matrix->show();
}

void setup()
{
  //初始化LED矩阵显示
  InitLED_Matrix();

  //显示 6 个字符,显示内容:Hello!,显示颜色:绿色(R,G,B)
  ShowMessage(matrix, "Hello!", 6, matrix->Color(0, 255, 0));
  delay(2000);
}

void loop()
{
  //清除之前的显示内容
  matrix->clear();
  //设置雨滴特效
  showRainingCode(matrix);
  //显示内容
  matrix->show();
  //控制雨滴下落速度
  delay(250);
}
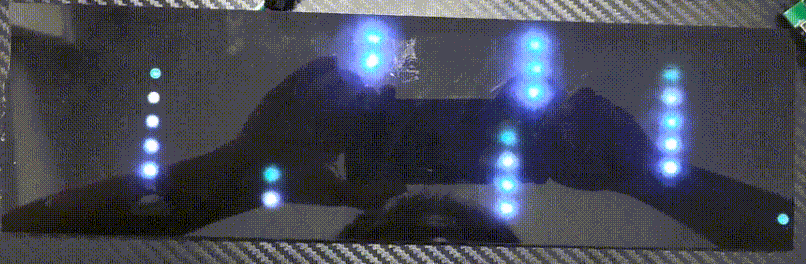
实物效果
烧录步骤不再描述,这里直接提供实物效果图。
使用黑色亚克力面板+白纸格挡光线显示
叠层从上到下是这样的:黑色亚克力面板 -> 白纸 -> LED矩阵
示例二:显示时钟并走时
并不是真的显示真实时间,这里只是显示个模型,方便我们后面搞好时钟模块的驱动后使用
文件创建分类
继续继用上一章节的 anim.h 和 anim.cpp,位置和文件名都不变。
编写代码
在anim.h中补充如下:
//时钟时钟
void weekBarDisplay(Adafruit_NeoMatrix *matrix,int week);
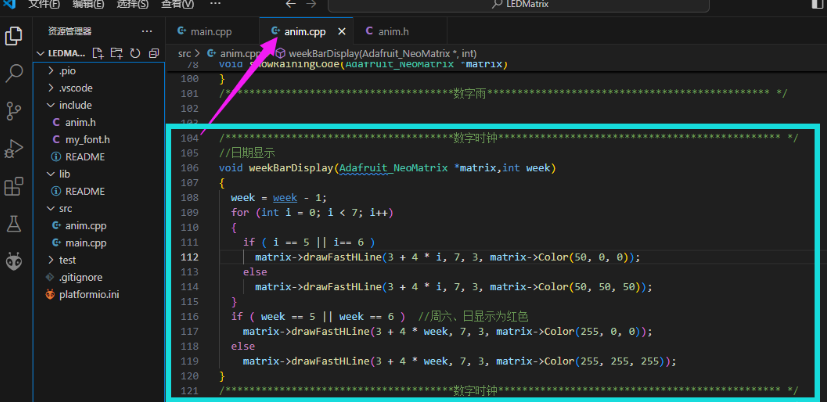
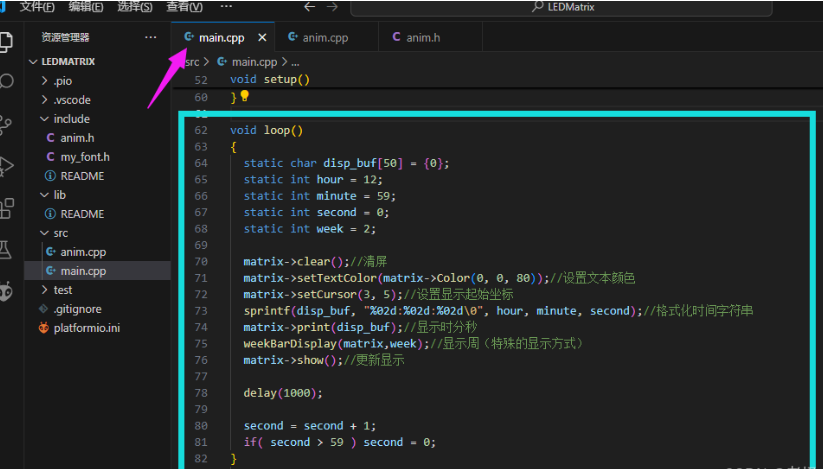
代码页面截图:

在anim.cpp 文件的末尾补充如下代码:
/**************************************数字时钟*********************************************** */
//日期显示
void weekBarDisplay(Adafruit_NeoMatrix *matrix,int week)
{
  week = week - 1;
  for (int i = 0; i < 7; i++)
  {
    if ( i == 5 || i== 6 )
      matrix->drawFastHLine(3 + 4 * i, 7, 3, matrix->Color(50, 0, 0));
    else
      matrix->drawFastHLine(3 + 4 * i, 7, 3, matrix->Color(50, 50, 50));
  }
  if ( week == 5 || week == 6 )  //周六、日显示为红色
    matrix->drawFastHLine(3 + 4 * week, 7, 3, matrix->Color(255, 0, 0));
  else
    matrix->drawFastHLine(3 + 4 * week, 7, 3, matrix->Color(255, 255, 255));
}
/**************************************数字时钟*********************************************** */
在main.cpp 文件中,将loop() 函数中更新为如下代码:
void loop()
{
  static char disp_buf[50] = {0};
  static int hour = 12;
  static int minute = 59;
  static int second = 0;
  static int week = 2;

  matrix->clear();//清屏
  matrix->setTextColor(matrix->Color(0, 0, 80));//设置文本颜色
  matrix->setCursor(3, 5);//设置显示起始坐标
  sprintf(disp_buf, "%02d:%02d:%02d\0", hour, minute, second);//格式化时间字符串
  matrix->print(disp_buf);//显示时分秒
  weekBarDisplay(matrix,week);//显示周(特殊的显示方式)
  matrix->show();//更新显示

  delay(1000);

  second = second + 1;
  if( second > 59 ) second = 0;
}
代码截图:
代码中时钟跑时部分是随便写的,这里就是写了一个显示时间的UI框架,并不是真实时间的跑时。
实物验证
烧录步骤不再描述,这里直接提供实物效果图。
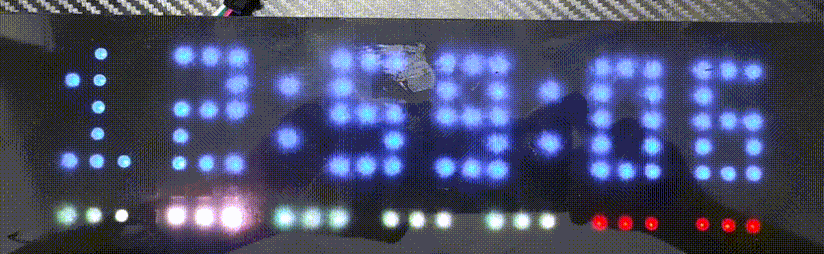
下方显示的周数,当前是周二,所以第二个高亮
说明:如果你根据代码操作运行不起来,可以下载👉例程看看